- 您现在的位置:买卖IC网 > Sheet目录225 > F2700AA06 (Curtis Industries)POWER ENTRY FILTERED 6A FASTON
PM1
(10Amp)
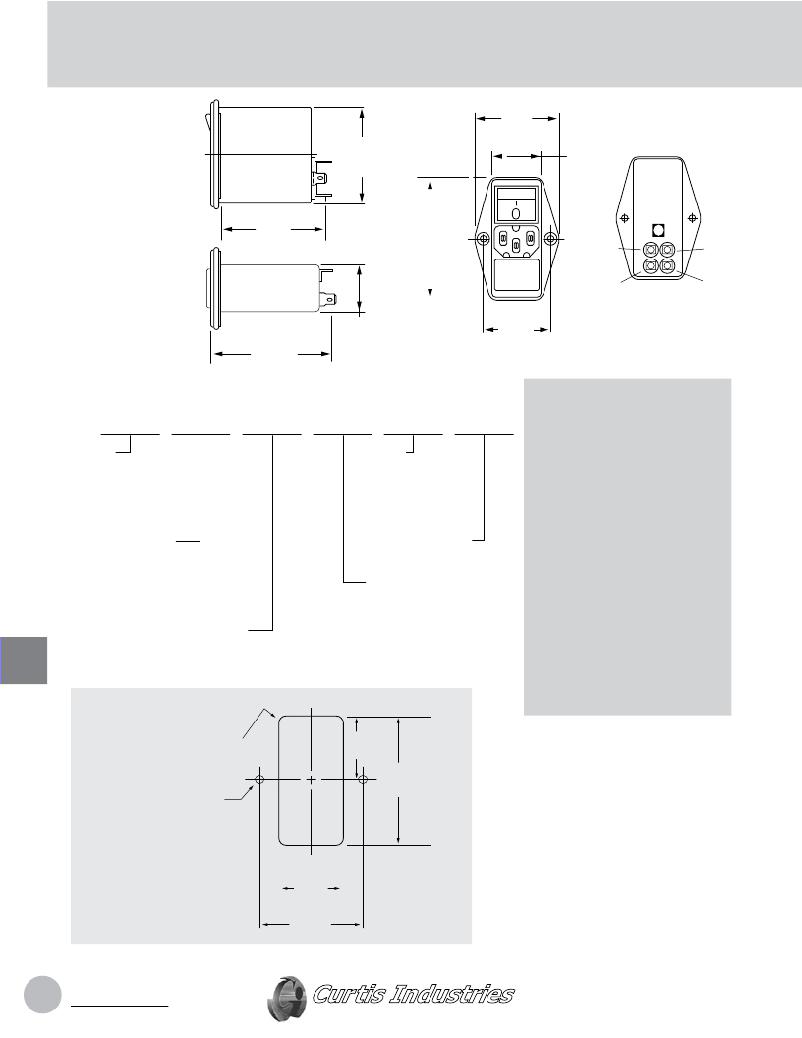
Dimensions
L
I
N
E
3.00
(76,2)
L
O
A
D
2.41
(61,2)
Max.
2.58
(65,5)
Max.
1.99
(50,5)
1.12
(28,4)
1
3
2
4
3.20
(81,3)
1.15
(29,2)
Max.
H
1.575
(40,01)
WITH
VOLTAGE
SELECTOR
How to Order
PM1
X
X
X
X
0
INSTALLATION INSTRUCTION
IMPORTANT – CHANGING
FUSE/VOLTAGE
SERIES
PM = Medical
Power Entry
MOUNTING
METHOD & FUSING
6 = Screw Mount Metric or U.S. Fuse*
8 = Screw Mount 2 Metric or U.S. Fuses
* U.S. Fuse not available without
voltage selector
VOLTAGE SELECTOR
0 = No Selector
3 = 115-230 VAC
OPTIONS
(Consult Factory)
1 = Standard Units
P = High Performance
Insertion Loss
CURRENT RATING
0 = 10 AMP
SWITCH
0 = No Switch
1 = SPST Rocker Switch
2 = DPST Rocker Switch
PM1
To change fuse, remove power cord.
Remove voltage selector and replace
fuse. Reinsert fuse holder. To change
the operating voltage on the PM1
Series, remove the power cord and
rotate fuse holder block until desired
voltage aligns with the mark on the
module housing.
? Filter shipped without fuse.
Always use caution when selecting
and changing fuses and voltage
requirements. Curtis Industries is
not responsible for malfunction due
to improper installation/selection of
fuse and/or voltage select.
PM1 Screw
Mount
Series
R.03
Max.
1.20
(30,6)
+.02
2.41 –0
(61,2)
M3
+.02
1.15 –0
(29,2)
1.575 ±.005
(40,0)
82
www.curtisind.com
Curtis Industries
A Division of Powers Holdings, Inc.
Speci ? cations subject to change.
Dimensions are shown for
reference purposes only.
发布紧急采购,3分钟左右您将得到回复。
相关PDF资料
F2800BB15
FILTER HI PERFORM 15A WIRE
F3000AA06
FILTER POWER LINE MED 6A FASTON
F3099AA06
FILTER POWER LINE EMI 6A FASTON
F3480T112
FILTER 3-PHASE 480V 112A
F721A108MMC
CAP TANT 1000UF 10V 20% SMD
F910E477MNC
CAP TANT 470UF 2.5V 20% 2312
F911A337MNC
CAP TANT 330UF 10V 20% 2917
F921V104MAA
CAP TANT 0.1UF 35V 20% 1206
相关代理商/技术参数
F2700BB06
制造商:Curtis Industries 功能描述:
F2700CA03
功能描述:POWER ENTRY FILTERED 3A FASTON RoHS:是 类别:滤波器 >> 电源输入 - 模块 系列:F2700 产品培训模块:5707 Power Entry Module 标准包装:10 系列:5707 保险丝盒:包括在内 安装类型:面板安装,螺孔 滤波器类型:通用型 特点:防尘,保险丝盒,屏蔽,防水 电压:125/250VAC 电流:1A 端接类型:快速连接 类型:IEC 320-C14(公引脚) 其它名称:486-1263
F2700CA06
功能描述:POWER ENTRY FILTERED 6A FASTON RoHS:是 类别:滤波器 >> 电源输入 - 模块 系列:F2700 产品培训模块:5707 Power Entry Module 标准包装:10 系列:5707 保险丝盒:包括在内 安装类型:面板安装,螺孔 滤波器类型:通用型 特点:防尘,保险丝盒,屏蔽,防水 电压:125/250VAC 电流:1A 端接类型:快速连接 类型:IEC 320-C14(公引脚) 其它名称:486-1263
F2700FB03
功能描述:FILTER FUSED SWITCHING 3A WIRE RoHS:是 类别:滤波器 >> 电源输入 - 模块 系列:F2700 产品培训模块:5707 Power Entry Module 标准包装:10 系列:5707 保险丝盒:包括在内 安装类型:面板安装,螺孔 滤波器类型:通用型 特点:防尘,保险丝盒,屏蔽,防水 电压:125/250VAC 电流:1A 端接类型:快速连接 类型:IEC 320-C14(公引脚) 其它名称:486-1263
F27074-000
制造商:TE Connectivity 功能描述:CXA-0066-18-1-9CS2973 - Cable Rools/Shrink Tubing
F27075-000
制造商:TE Connectivity 功能描述:PTC Resettable Fuse 240VAC T/R 制造商:TE Connectivity 功能描述:- Tape and Reel 制造商:TE Connectivity 功能描述:POLYSWITCH PTC RESET 0.25A T/R 制造商:TE Connectivity / Raychem 功能描述:POLYSWITCH PTC RESET 0.25A RAD 制造商:TE Connectivity 功能描述:LVR025K-2 制造商:TE CONNECTIVITY RAYCHEM-POLYSWITCH 功能描述:LINE VOLTAGE PRODUCTS / LVR025K-2
F2708
制造商:Fairchild Semiconductor Corporation 功能描述:
F270C10
制造商:OMRON AUTOMATION AND SAFETY 功能描述:F270 CONTROLLER NPN IN/OUTPUT
